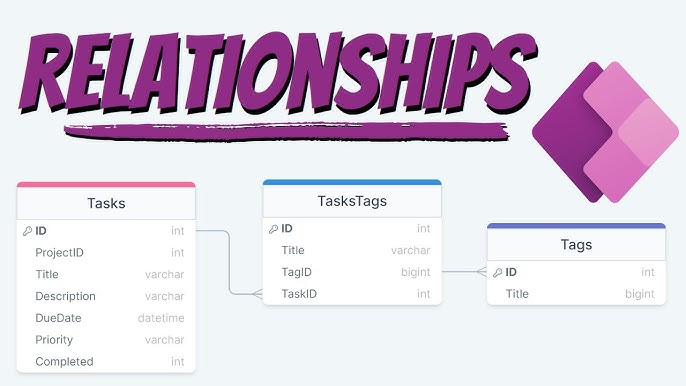
How to Create a One-to-One Relationship in Dataverse
Welcome, fellow data wrangler! 🐎 Whether you're a seasoned Dataverse daredevil or just dipping your toes into the vast ocean of Microsoft’s Power Platform, you're in the right place. Today, we're embarking on a quest to create a one-to-one relationship in Dataverse. Now, you might be thinking, "Wait, doesn't Dataverse play hard to get with one-to-one relationships?" You’re absolutely right!
But fear not, because we’ve got a slick workaround that’ll make your data connections smoother than a fresh jar of Skippy. 🥜 This guide is packed with dad jokes, pop culture references, and techie puns to make your learning journey as enjoyable as binge-watching your favourite sitcom. So, grab your virtual toolkit, and let's dive into the delightful world of Dataverse relationships! 🚀
Understanding Relationships in Dataverse
Before we dive into the nitty-gritty of one-to-one relationships, let's set the stage by understanding what a relationship is in Dataverse. Think of relationships as the social connections in your data universe—friends, family, or maybe frenemies (we’re not judging). 👫
In Dataverse, relationships define how tables (formerly known as entities) interact with each other. They establish connections that allow data to be related and accessed seamlessly across different tables. Just like in any good story, relationships ensure that characters (or data points) can interact in meaningful ways, creating a cohesive narrative for your applications.
Types of Relationships
Dataverse supports several types of relationships, each with its own unique dynamics:
- One-to-One (1:1): Imagine Batman and Robin—each hero has exactly one sidekick, and vice versa. Perfectly paired!
- One-to-Many (1:N): Think of a parent and their children. One parent can have multiple kids, but each child has only one parent.
- Many-to-Many (N:N): Picture the Avengers assembling—any hero can team up with any other hero, creating a web of relationships.
Understanding these relationship types is like knowing your Marvel characters' powers—they help you decide the best way to connect your data for optimal performance and clarity.
The One-to-One Relationship Dilemma
Here’s the plot twist: Dataverse doesn’t natively support one-to-one relationships. It’s like trying to get Ross and Rachel to stay together without any drama—challenging, right? But don’t worry, because where there's a will, there's a way. We’re about to unveil a clever workaround that’ll have your data playing nicely in no time.
Why You Might Want a One-to-One Relationship
You might be wondering, "Why go for a one-to-one relationship when other types exist?" Well, simplicity is key! Here’s why:
- Data Segregation: Separate sensitive information from general data. Think of it as keeping your superhero identity under wraps.
- Performance: Enhance query performance by reducing table size. Faster than a speeding bullet!
- Clarity: Make your data model more understandable and maintainable. No more tangled webs like Spider-Man’s!
Think of it as having a secret lair separate from the Batcave—keeps things organized and secure!
Pre-requisites: Getting Your Ducks in a Row
Before we start building our Dataverse masterpiece, let’s ensure you have everything you need:
- Access to Dataverse: Make sure you have the necessary permissions. No need to hack into the mainframe—just the legit way!
- Tables Ready: Identify the two tables you want to link. It’s like choosing which characters join your superhero squad.
- Basic Understanding: Familiarity with Dataverse’s interface will be helpful. If you can navigate a spaceship, you can navigate Dataverse!
If you’ve got these covered, you’re ready to roll like a Data Ninja! 🥷
The Workaround: Creating a One-to-One Relationship
Dataverse doesn’t natively support one-to-one relationships, we’re going to engineer our own version of this dynamic duo. Think of it as crafting your very own Batman-Robin pair from scratch. Here's how you can achieve a one-to-one relationship by creating a lookup column in both tables respectively. Follow these steps, and soon your data will be as synchronized as the Avengers on a mission!
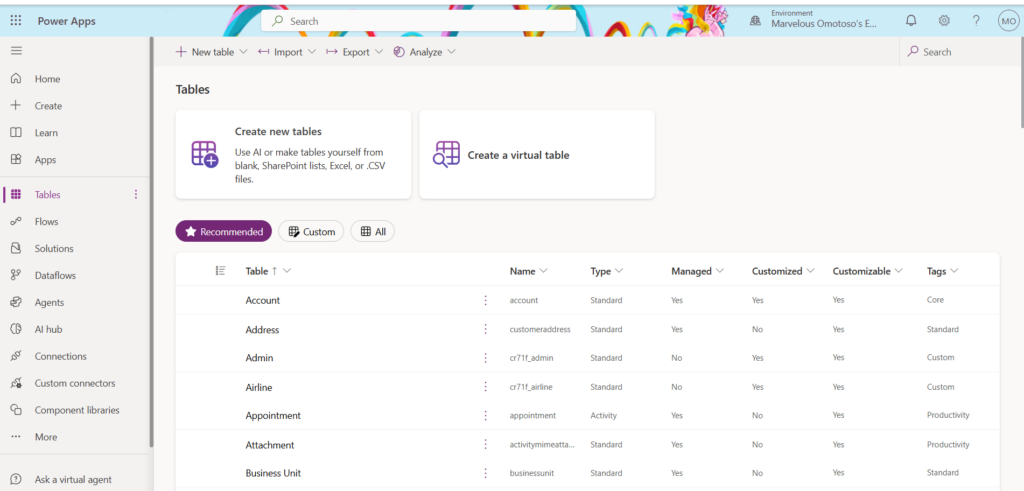
Step 1
First things first, log in to your make.powerapps.com account and navigate to Tables. Picture it as your digital library where all your data heroes reside. 📚
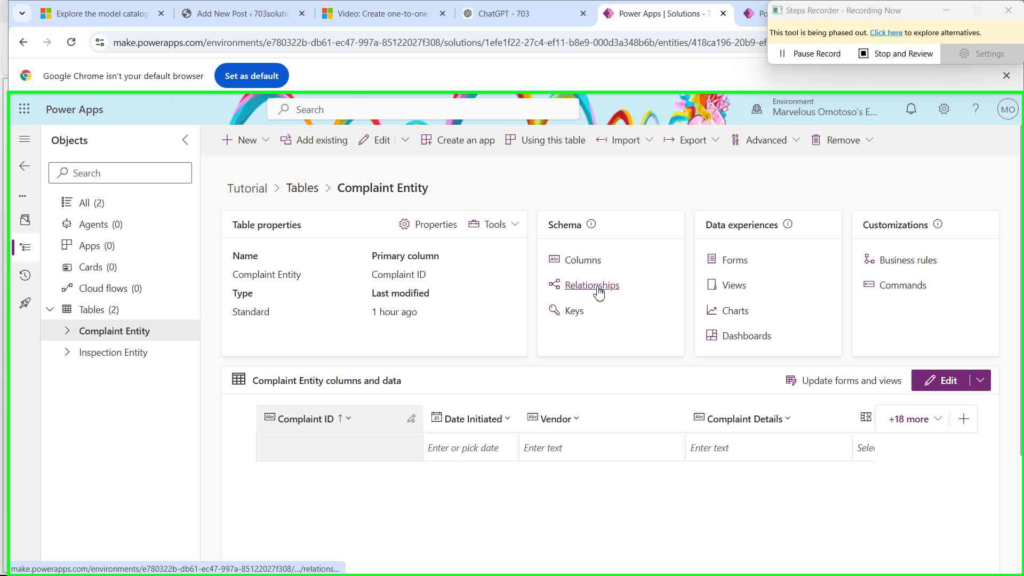
Step 3: Selecting Your Primary Table
Choose the primary table you want to establish the relationship from. In this example, we’ll use a table I created called Complaint to save complaints from vendors. We want to create a one-to-one relationship between the Complaint table and the Inspection table—meaning one complaint will only be linked to one inspection. Think of it as ensuring each complaint has its very own inspection sidekick, no more multi-tasking inspections!
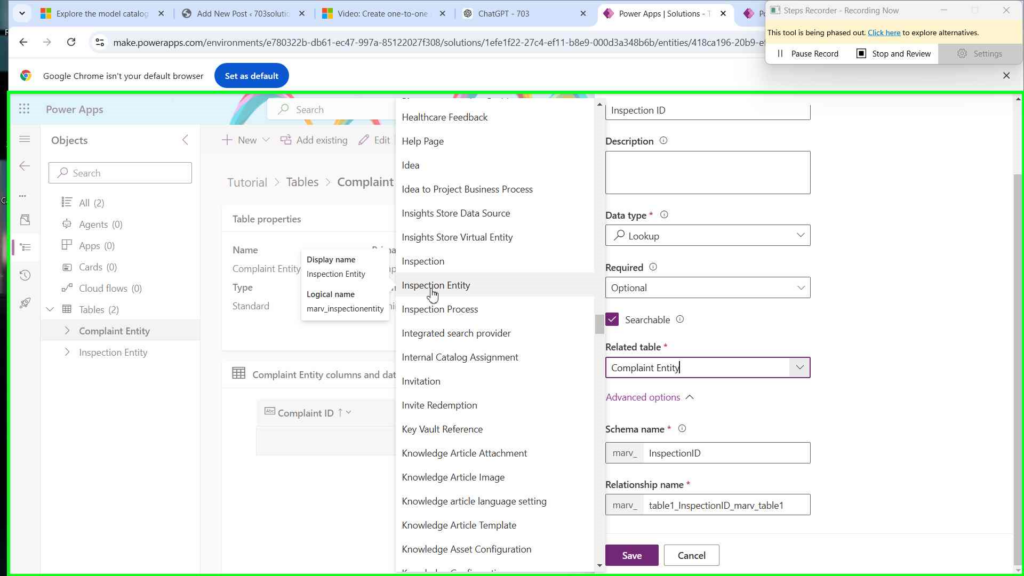
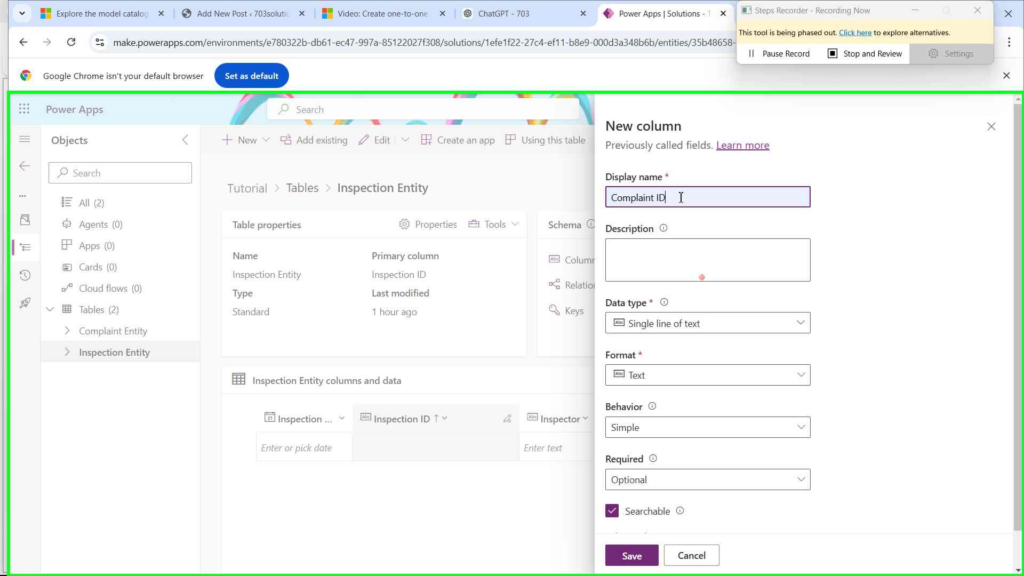
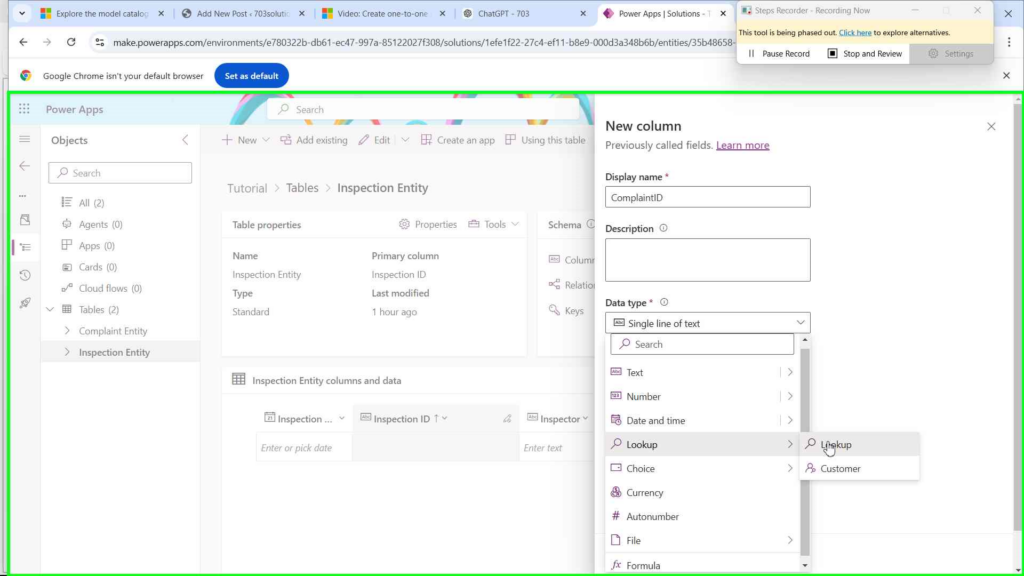
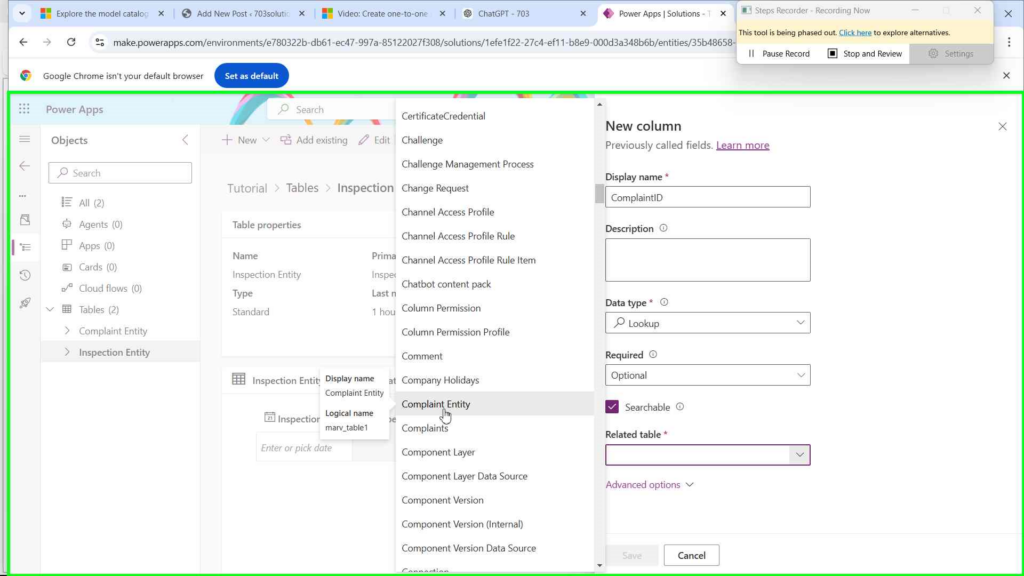
Step 4: Creating a Lookup Column in the Primary Table (Complaint)
Now, let’s add a lookup column to your primary table (Complaint) that will reference the related table (Inspection).
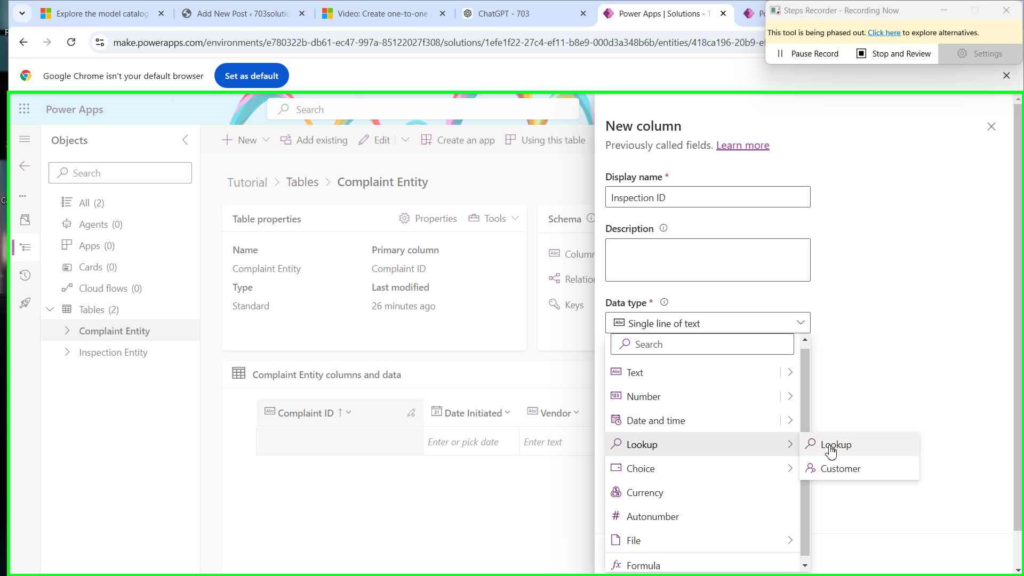
Pro Tip: Naming your columns clearly helps keep your data model as organized as Tony Stark’s lab.
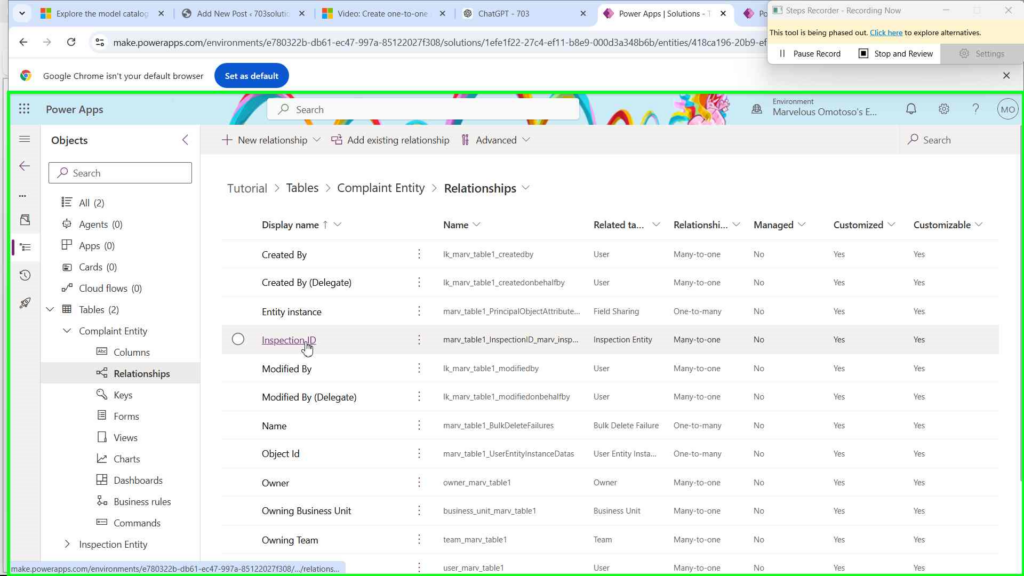
Step 5: Setting up Rules for the Relationship that was autogenerated
Remember the relationship name we noted in the previous step? Time to make use of it. Navigate to the relationship the system auto generated within the Complaints Table. (refer to the images below)
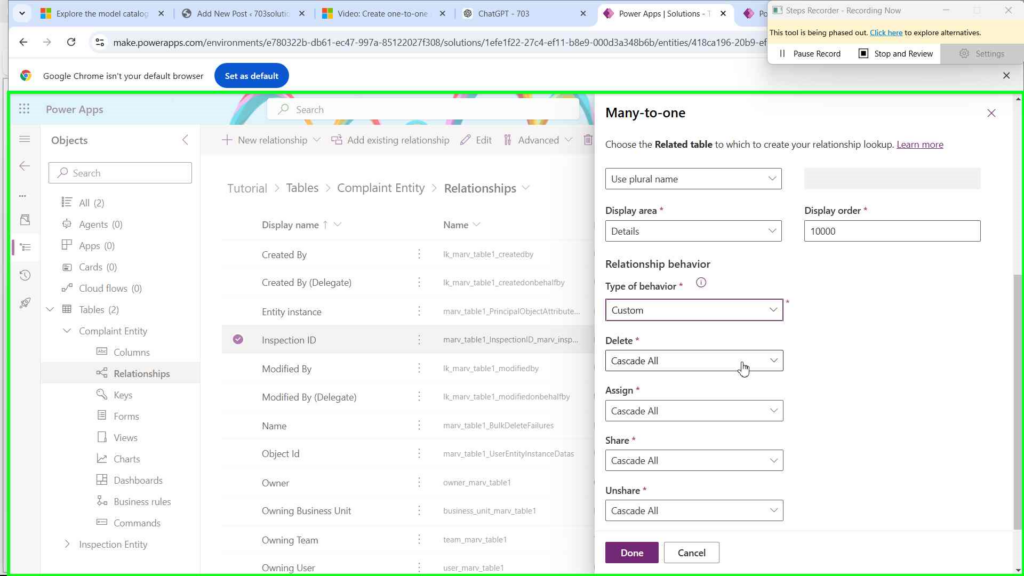
To give a brief explanation of what Cascade All means
When you set Cascade All, you're essentially telling Dataverse, "Hey, whenever something happens to a record in the primary table (Complaint in our example), automatically apply the same action to the related record in the secondary table (Inspection)." It’s like Batman disappearing into the Batmobile—when Batman (the primary record) takes action, Robin (the related record) follows seamlessly.
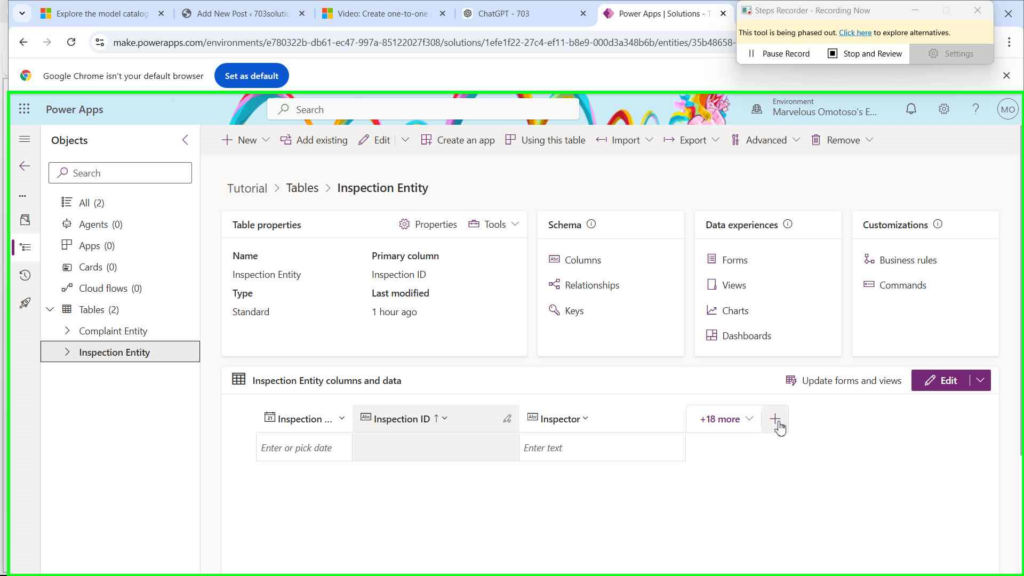
Step 6: Creating a Lookup Column in the Related Table (Inspection)
Now, let’s mirror that magic by adding a lookup column to the related table (Inspection) that references the primary table (Complaint). Follow the exact steps you used for the Complaint table, but this time, apply them to the Inspection table.
Understanding the Auto-Created Relationships 🕵️♂️🔗
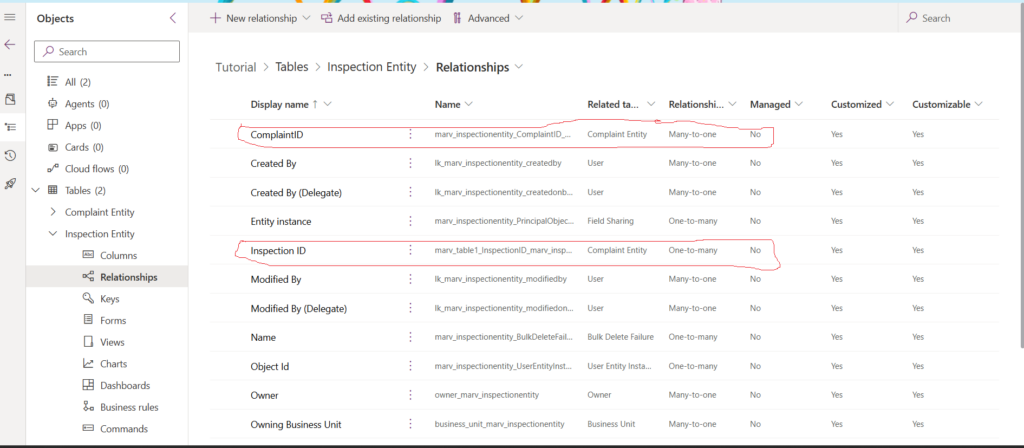
Now that you've successfully created lookup columns in both the Complaint and Inspection tables, Dataverse has automatically stepped in to manage your data connections. But what exactly has Dataverse done behind the scenes? Let’s break it down faster than The Flash on a caffeine high!
What Just Happened? 🤔
When you added a lookup column to each table, Dataverse didn’t just sit back and watch. Instead, it took charge and auto-generated two relationships for each table. It’s like Dataverse decided to play both Batman and Robin in your data universe. Here’s the scoop:
- In the Complaint Table:
- One-to-Many (1:N) Relationship:
- Complaint (One): Each Complaint can be linked to many Inspections.
- Inspection (Many): Each Inspection is linked to one Complaint.
- Many-to-One (N:1) Relationship:
- Inspection (Many): Each Inspection can be linked to one Complaint.
- Complaint (One): Each Complaint is linked to many Inspections.
- One-to-Many (1:N) Relationship:
- In the Inspection Table:
- One-to-Many (1:N) Relationship:
- Inspection (One): Each Inspection can be linked to many Complaints.
- Complaint (Many): Each Complaint is linked to one Inspection.
- Many-to-One (N:1) Relationship:
- Complaint (Many): Each Complaint can be linked to one Inspection.
- Inspection (One): Each Inspection is linked to many Complaints.
- One-to-Many (1:N) Relationship:
Why Two Relationships? 🌀
Dataverse is like a meticulous librarian—it ensures every book (or record) is correctly cataloged and related. When you create a lookup column in Complaint referencing Inspection, Dataverse establishes a one-to-many relationship because, in theory, one complaint could have multiple inspections. Similarly, adding a lookup column in Inspection referencing Complaint creates a many-to-one relationship, allowing multiple inspections to link back to a single complaint.
But wait! We’re aiming for a one-to-one relationship. How does this happen? It’s all about those unique constraints you set earlier. Let’s dive deeper.
Turning One-to-Many and Many-to-One into One-to-One 🧙♂️✨
Here’s the magic trick: by enforcing unique values on both lookup columns, you’re essentially saying, “Hold up! Each complaint can only have one inspection, and each inspection can only be linked to one complaint.” This transforms our one-to-many and many-to-one relationships into a one-to-one relationship. It’s like giving each superhero their exclusive sidekick—no sharing allowed!
How Does It Work?
- Unique Lookup in Complaint Table:
- Complaint → Inspection: Since the Inspection Reference in Complaint is unique, each complaint can link to only one inspection. Think of it as Batman having only one Robin—no multiple sidekicks here!
- Unique Lookup in Inspection Table:
- Inspection → Complaint: Similarly, the Complaint Reference in Inspection is unique, ensuring each inspection is linked to only one complaint. It’s like Robin knowing he’s only paired with Batman—exclusive and streamlined.
By setting both lookup columns to enforce unique values, you’ve effectively created a mutually exclusive one-to-one relationship. This means:
- Each Complaint is linked to only one Inspection.
- Each Inspection is linked to only one Complaint.
Common Pitfalls and How to Avoid Them
Even the best superheroes have their kryptonite. Here are some common mistakes and how to dodge them:
1. Mismatched Data Types
Ensure that the fields you’re linking have compatible data types. It’s like trying to fit a square peg in a round hole—frustrating and ultimately unsuccessful.
Solution: Double-check data types before establishing the relationship.
2. Ignoring Relationship Behaviour
Not setting the right behavior can lead to data anomalies. Think of it as forgetting to set boundaries in a relationship—chaos ensues.
Solution: Use Referential behavior to maintain data integrity.
3. Overcomplicating Relationships
Keep it simple. Overly complex relationships can make your data model harder to manage.
Solution: Stick to one-to-one when appropriate and use other relationship types when necessary.
4. Neglecting Security Roles
Failing to set proper security roles can expose sensitive data. It’s like leaving your superhero costume at the dry cleaners—anyone can access it!
Solution: Assign appropriate security roles to control access to related tables.
Advanced Tips: Taking Your Relationships to the Next Level
Ready to level up? Here are some pro tips to make your one-to-one relationships even more powerful:
1. Utilize Business Rules
Implement business rules to automate data processes and ensure consistency across related tables. It’s like having Jarvis handle your data—efficient and smart!
2. Leverage Security Roles
Protect sensitive data by setting appropriate security roles on each table, ensuring only authorized users can access specific information. Think of it as your data's personal bodyguard.
3. Optimize Performance
Index your fields and optimize queries to ensure your relationships don’t slow down your system. Think of it as tuning your Batmobile for maximum performance.
4. Integrate with Power Automate
Automate workflows between related tables to enhance productivity and reduce manual tasks. It’s like having your own Alfred to manage the behind-the-scenes operations.
5. Implement Cascading Behaviours
Set up cascading behaviors to define how changes in one table affect related tables. It’s like setting rules in a friendship—everyone knows what to expect!
Conclusion
Congratulations! 🎉 You’re now equipped with the knowledge and skills to create a one-to-one relationship in Dataverse like a pro. While Dataverse might not hand you a one-to-one relationship on a silver platter, your newfound workaround ensures your data remains clean, efficient, and well-connected.
Remember, in the world of Dataverse, relationships are the glue that holds your data universe together. So, go forth and create harmonious data connections with confidence, a smile, and maybe a dad joke or two along the way. After all, even Leonardo da Vinci knew that a little humor can go a long way in mastering the complexities of art and science!
Stay data-awesome, and may your relationships always be strong and singular! 🚀✨
Questions?
If you have any questions or feedback about How to Create a One-to-One Relationship in Dataverse please leave a message in the comments section below. You can post using your email address and are not required to create an account to join the discussion.